Step-by-Step Tutorial to Mint a Chia NFT project (Dev Friendly)
If you are learning how to use Python or comfortable with Unix then this tutorial is for you. Looking for custom Chia NFT metadata tool? Yup, this is also the tutorial for you. Let’s explore how to mint using NFT Generate Metadata and Chia NFT Minter toolsets to create a project from scratch. Even if you are not a dev this is a good overview of the steps involved in minting an NFT project.
Minting Tools
Is your project straightforward and you “just want it to work” then considering using Mint Garden Studio. This is an excellent mint tool that doesn’t use a custodial wallet (the way SkyNFT.org does). Why am I attempting to prevent from reading the rest of this article? Because if you are dreamer and you struggle with getting a project completed, then use the simplest tool first to get the job done.
Keep reading if you have custom metadata needs or doing some cool experimentation. Do let me know if you use these tools or need help getting setup. I’d love to learn and share your project with others in the Chia community.
Prepare to Mint
You will need a few things before you hit the big green “Mint” button:
- Create the NFT project art/data.
- Choose the data hosting (IPFS/Arweave/your server)
- Upload the art/data and license to IPFS/Arweave
- The only/main reason to upload at this stage is when your metadata needs to reference the images for historical record.
- Create the NFT project art/data metadata.
- Choose the NFT license as text/pdf.
- Create a new UUID for the collection.
- Upload the metadata and license to IPFS/Arweave
- Create the hashes of the
- art/data
- metadata
- license
- Create a file containing above URLs and hashes in a JSON format.
- Mint the project on Chia blockchain.
Create the Artwork/Project
At this point most NFT projects are focused on art and thus mostly minted as “JPEGs”. Most projects I’ve seen are minting JPEG, PNG, and GIF file formats. The Chia wallet doesn’t work well with other formats (i.e. vector) as of writing this article thus this is what folks are minting.
This steps should be failry obvious regardless if you are minting a PFP, generative, or utility based project. For the rest of the steps I’ll be referecing the For Ukraine | Project (FU|P) Limited Edition mint.
The biggest reason I’m having to use custom minting tools is because this project requires custom metadata.
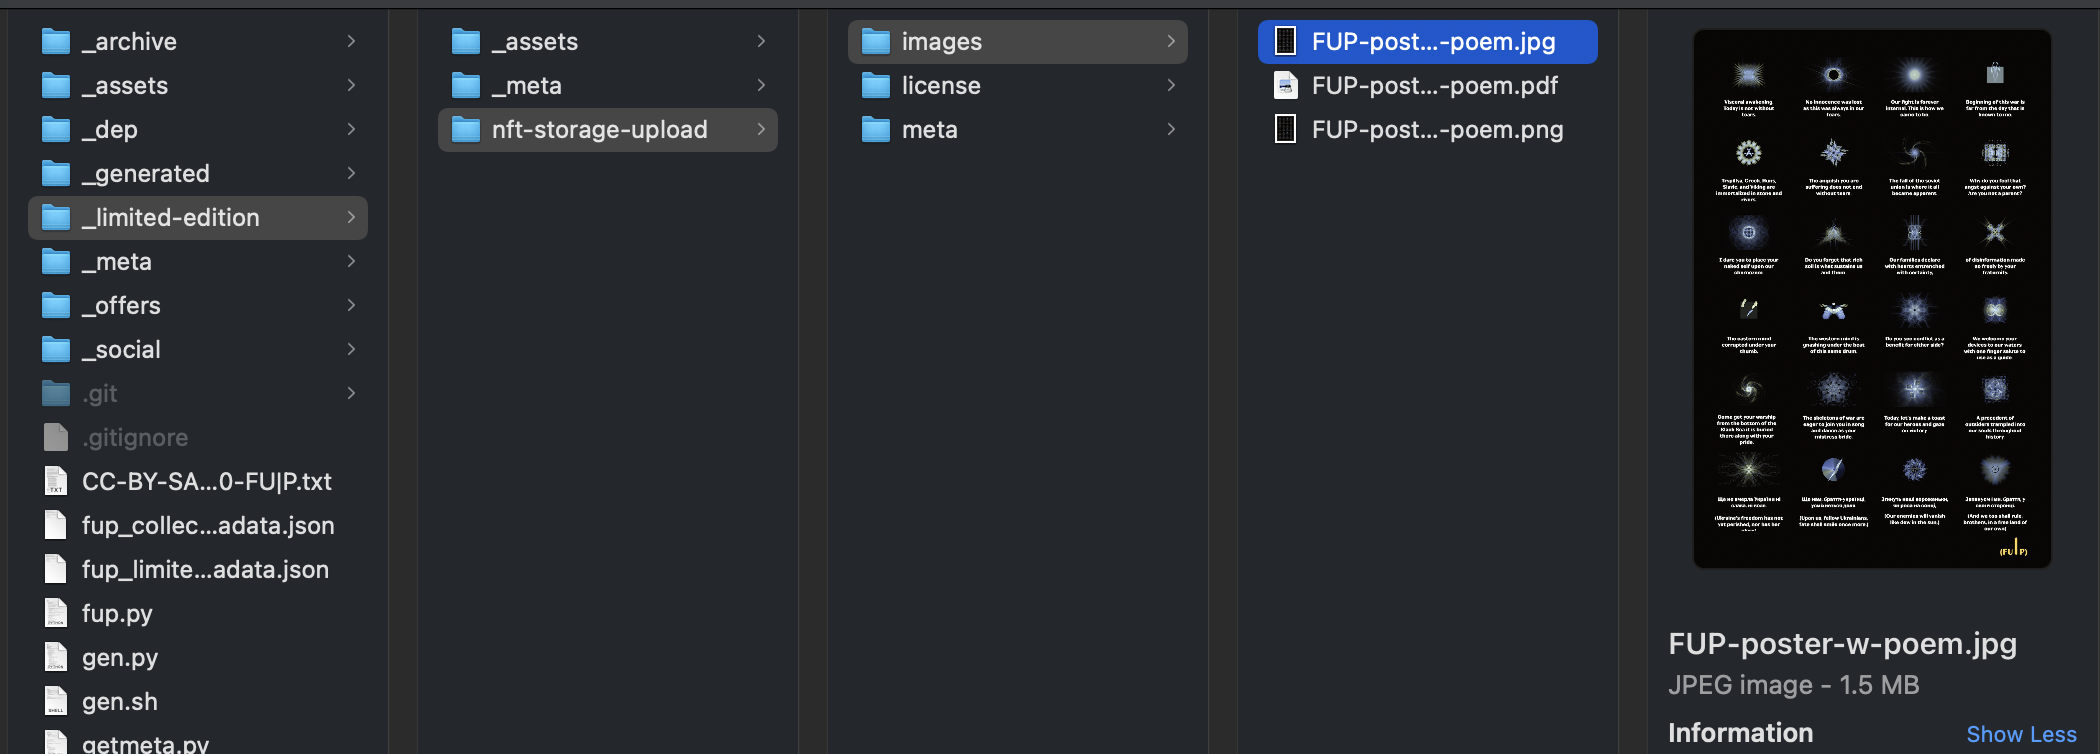
In case of FU|P, the poster image being minted and hashed is not actually a good quality being a 1.5 MB JPG.
The actual image is designed to be printed as 24” x 36” poster with 4K images embedded in the final 130 MB+ PDF.
Offical Chia wallet supposedly caps out at 10 MB raster files and a few other Chia ecosystem tools support up to 100 MB.
Upload artwork files to permastore (optional)
In the case of For Ukraine | Project (FU|P) there is 1 poster presented as 3 files. The 3 files are:
- JPEG (~1.5 MB) - raster thumbnail for Chia wallet and NFT galleries to display.
- PNG (~25 MB) - raster for closer inspection of what the poster image.
- PDF (~130 MB) - each image is 4K resolution and embedded in a PDF with vector poem text at highest possible resolution.
The PDF needs to be referenced as a URI within the metadata thus the files need to be uploaded to IPFS/Arweave.
One of the easiest ways to upload is simply via NFT Storage.
They also provide a very easy to use desktop app NFTup and web UI.
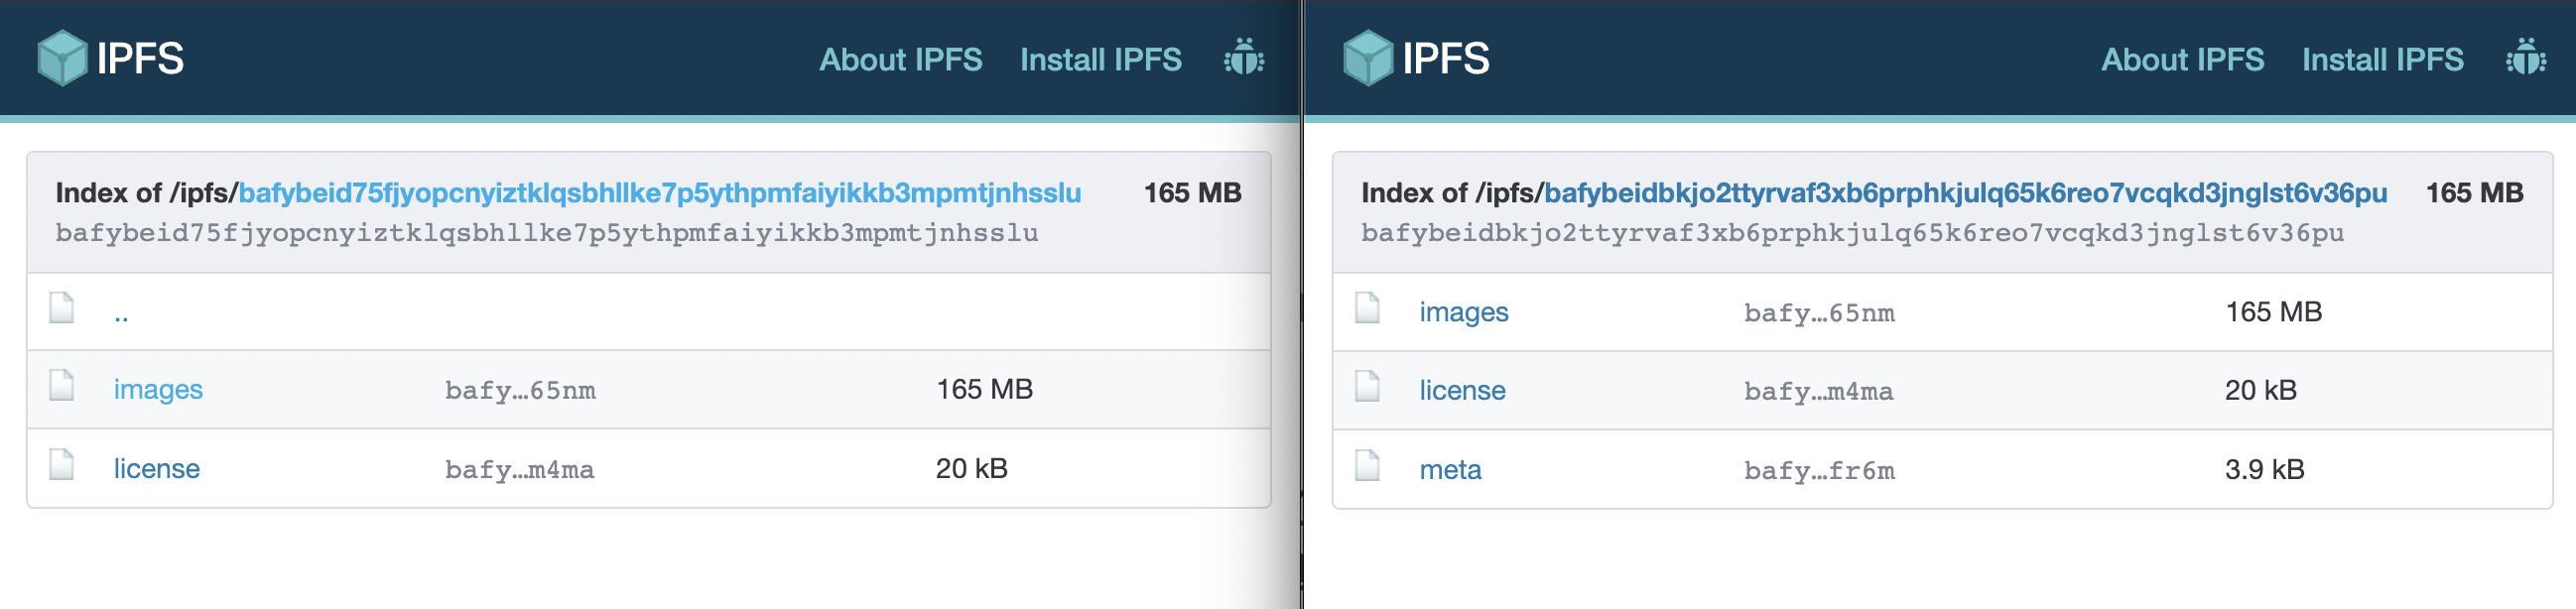
For example, for FU|P limited edition here’s how I organized empty directories that only included the images to be uplaoded to IPFS:
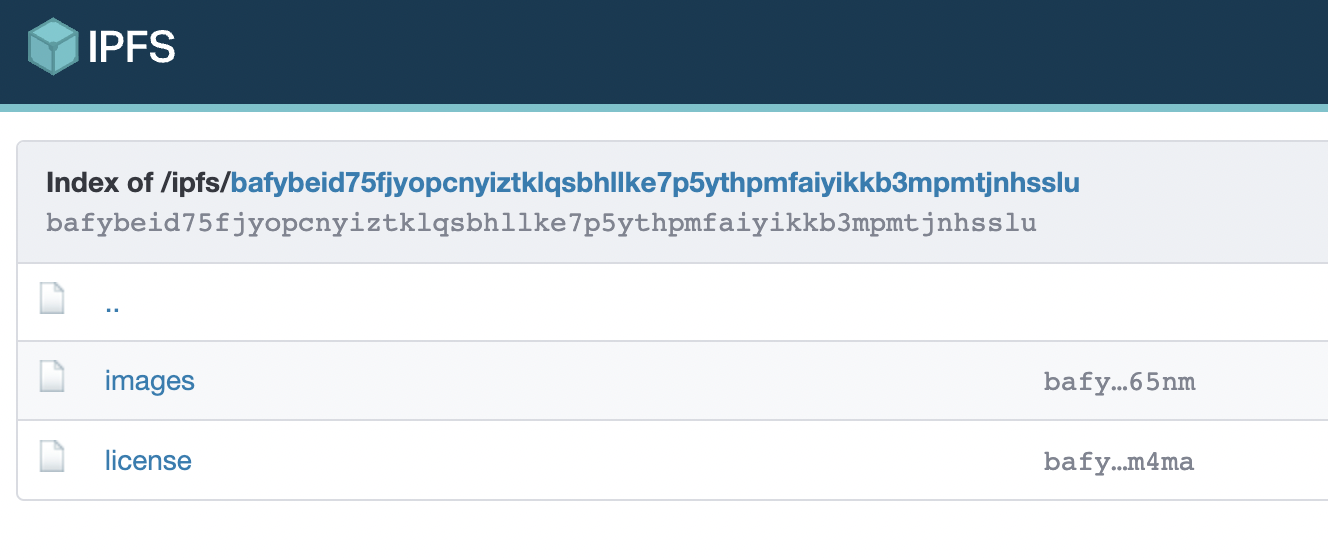
If you are not familiar with IPFS then you have to keep in mind that after your metadata uploads the root CID will change. Wait, what!? Doesn’t that mean you can’t reference the the PDF’s CID in the metadata because the metadata will change the root CID of the uploaded “directories”. Yes, it does, but that’s why if you upload the images as a subdirectory then the child CID won’t change and can still be referenced later.
Here’s an example of root CID for the uplaod of the nft-storage-upload dir to IPFS:
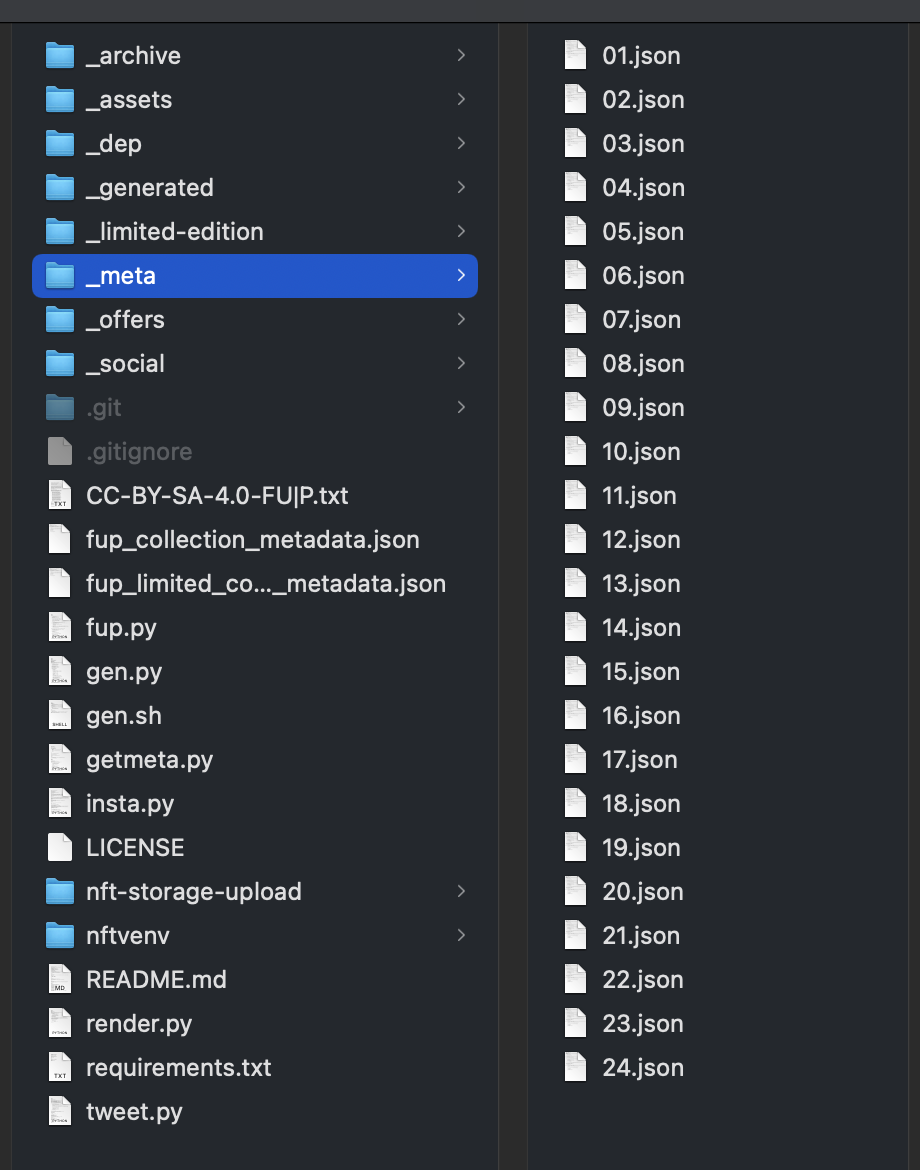
This is a screenshot from later in the project that includes the meta sub directory where the meta IPFS CID remains the same even though the root CID changed:
Create and Validate the Metadata
Creation and validation is made easy with NFT Generate Metadata toolset.
Metadata: Create collection UUID
First, create the collection UUID via metadata.py -gu. This will be forever for your entire collection.
$ python3 metadata.py -gu
B647558F-575E-4B43-AC26-D0B9089FA429
Metadata: Create collection sub-metadata
Second, create the reusable collection metadata file that’ll get injected into each NFT metadata you will create.
Locally, copy the template collection metadata file rename to <your-project-name>_collection_metadata.json.
Edit this file and update:
- The UUID you generated earlier
- Collection description
- URI and other relevant attributes
For example:
{
  "collection": {
    "name": "For Ukraine|Project (FU|P) - Limited Edition Poster",
    "id": "B647558F-575E-4B43-AC26-D0B9089FA429",
    "attributes": [
      {
        "type": "description",
        "value": "Limited edition poem poster of the For Ukraine|Project (FU|P) that includes all twenty four generative pieces and their descriptions in visual display of the embedded poem."
      },
      {
          "type": "icon",
          "value": "https://scotopic.xyz/assets/img/chia/nfts/fup-limited/thumbnail.png"
      },
      {
          "type": "banner",
          "value": "https://scotopic.xyz/assets/img/chia/nfts/fup-limited/banner.png"
      },
      {
        "type": "twitter",
        "value": "@alxgoryuk"
      },
      {
        "type": "website",
        "value": "https://scotopic.xyz"
      }
    ]
  }
}
Metadata: Create individual NFT metadata (single file output)
Above will feed into the creation of the individual art image/NFT’s metadata. You can automate creation of all your custom metadata by passing the custom attributes via JSON objects:
NFT_FILE_OUTPUT_NAME="fup-limited-meta"
NFT_NAME="For Ukraine|Project - Limited Edition Poster"
NFT_DESCRIPTION="Limited edition poster image of the For Ukraine|Project (FU|P) that includes all 24 generative NFTs and their descriptions in visual display of the embedded poem."
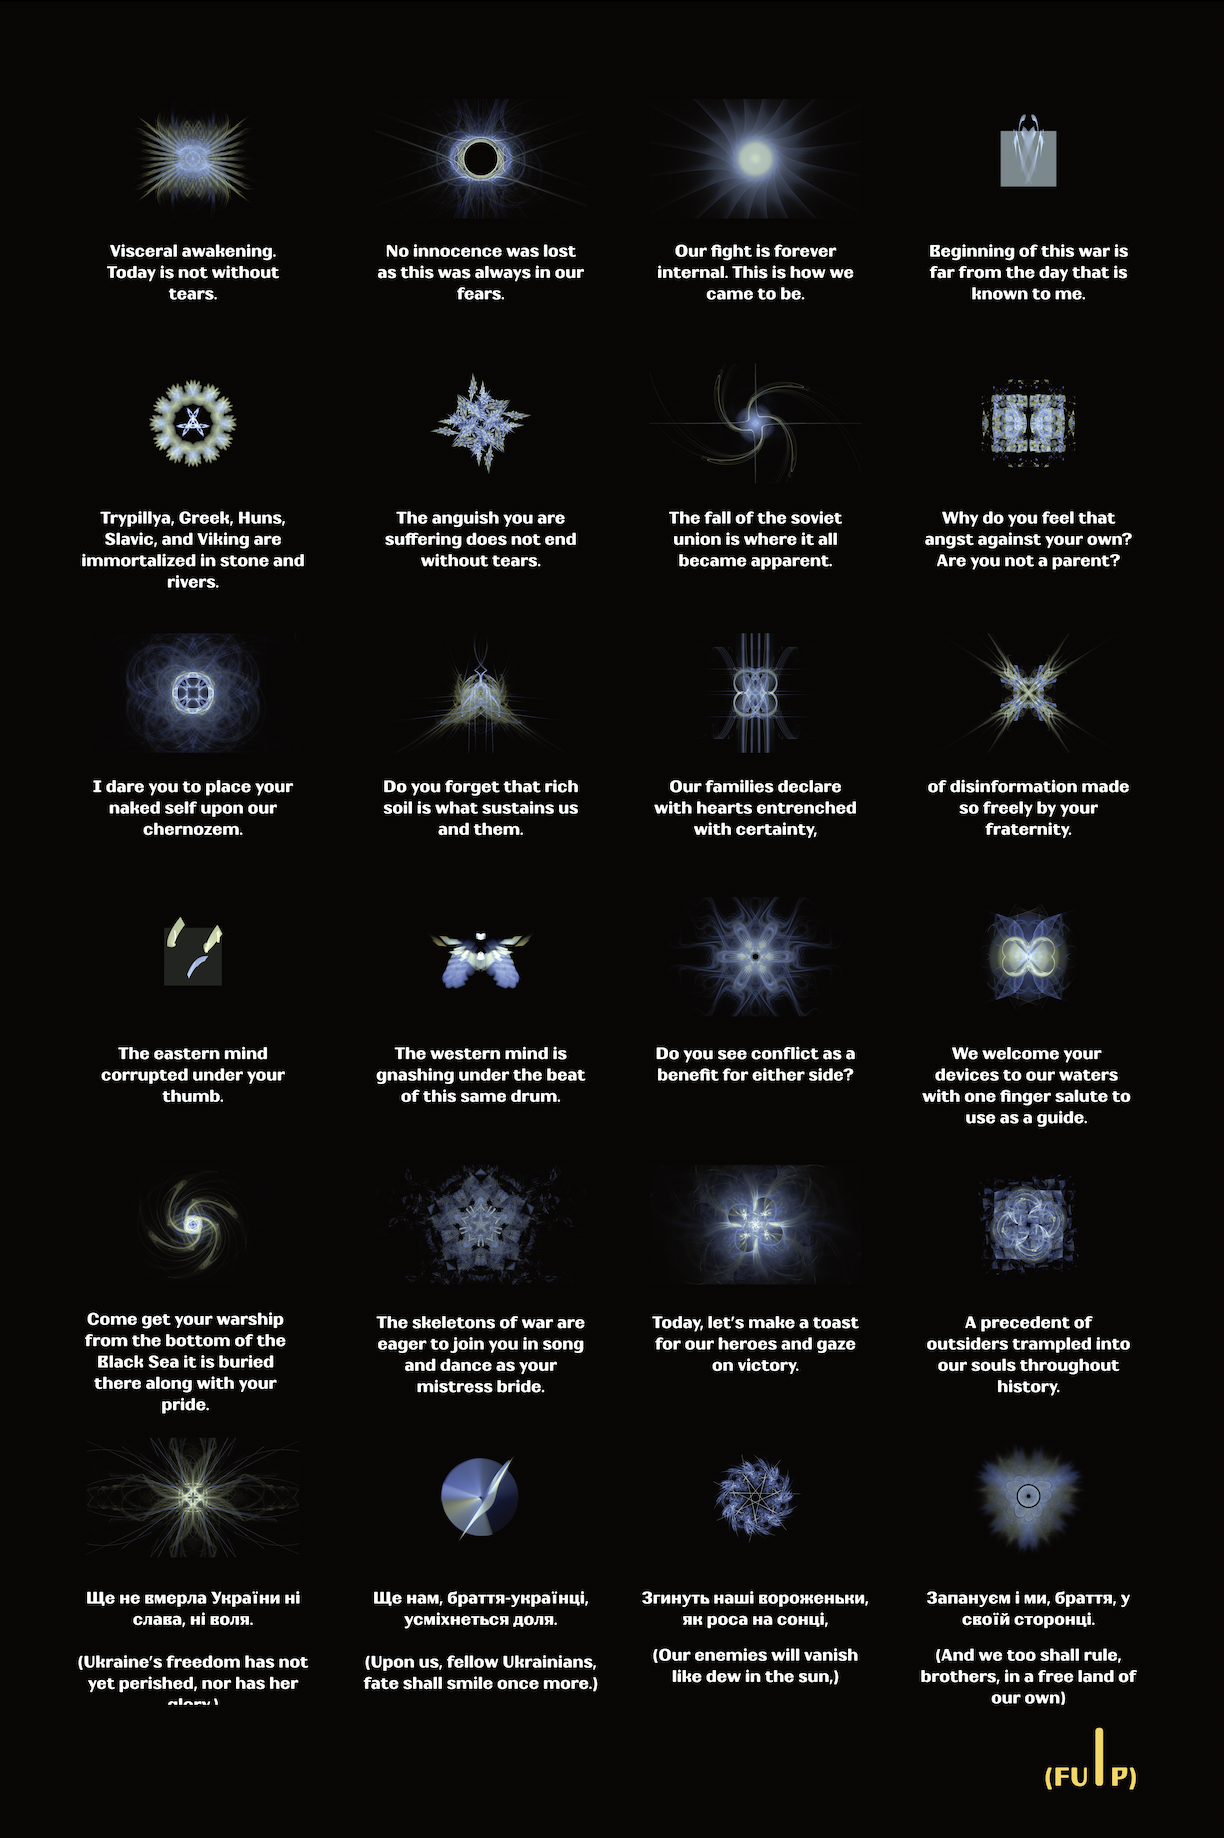
POEM_VALUE="Visceral awakening. Today is not without tears.\nNo innocence was lost as this was always in our fears.\nOur fight is forever internal. This is how we came to be.\nBeginning of this war is far from the day that is known to me.\nTrypillya, Greek, Huns, Slavic, and Viking are immortalized in stone and rivers.\nThe anguish you are suffering does not end without tears.\nThe fall of the soviet union is where it all became apparent.\nWhy do you feel that angst against your own? Are you not a parent?\nI dare you to place your naked self upon our chernozem.\nDo you forget that rich soil is what sustains us and them.\nOur families declare with hearts entrenched with certainty,\nof disinformation made so freely by your fraternity.\nThe eastern mind corrupted under your thumb.\nThe western mind is gnashing under the beat of this same drum.\nDo you see conflict as a benefit for either side?\nWe welcome your devices to our waters with one finger salute to use as a guide.\nCome get your warship from the bottom of the Black Sea it is buried there along with your pride.\nThe skeletons of war are eager to join you in song and dance as your mistress bride.\nToday, let's make a toast for our heroes and gaze on victory.\nA precedent of outsiders trampled into our souls throughout history.\nЩе не вмерла України ні слава, ні воля. (Ukraine's freedom has not yet perished, nor has her glory,)\nЩе нам, браття-українці, усміхнеться доля. (Upon us, fellow Ukrainians, fate shall smile once more.)\nЗгинуть наші вороженьки, як роса на сонці, (Our enemies will vanish like dew in the sun,)\nЗапануєм і ми, браття, у своїй сторонці. (And we too shall rule, brothers, in a free land of our own)"
NFT_CUSTOM_METADATA='{"Editions Total": 16, "Poster Preview URI":"https://bafybeid75fjyopcnyiztklqsbhllke7p5ythpmfaiyikkb3mpmtjnhsslu.ipfs.nftstorage.link/images/FUP-poster-w-poem.png", "Poster Vector URI":"https://bafybeid75fjyopcnyiztklqsbhllke7p5ythpmfaiyikkb3mpmtjnhsslu.ipfs.nftstorage.link/images/FUP-poster-w-poem.pdf", "Poem": "'"${POEM_VALUE}"'"}'
python metadata.py -cm fup_limited_collection_metadata.json -od "_limited-edition/_meta" -gm "$NFT_FILE_OUTPUT_NAME" "$NFT_NAME" "$NFT_DESCRIPTION" "${NFT_CUSTOM_METADATA}"
Which results in a templated metadata file being written out as:
{
    "format": "CHIP-0007",
    "name": "For Ukraine|Project - Limited Edition Poster",
    "description": "Limited edition poster image of the For Ukraine|Project (FU|P) that includes all 24 generative NFTs and their descriptions in visual display of the embedded poem.",
    "sensitive_content": false,
    "attributes": [
        {
            "trait_type": "Generation",
            "value": 1
        },
        {
            "trait_type": "Editions Total",
            "value": "16"
        },
        {
            "trait_type": "Poster Preview URI",
            "value": "https://bafybeid75fjyopcnyiztklqsbhllke7p5ythpmfaiyikkb3mpmtjnhsslu.ipfs.nftstorage.link/images/FUP-poster-w-poem.png"
        },
        {
            "trait_type": "Poster Vector URI",
            "value": "https://bafybeid75fjyopcnyiztklqsbhllke7p5ythpmfaiyikkb3mpmtjnhsslu.ipfs.nftstorage.link/images/FUP-poster-w-poem.pdf"
        },
        {
            "trait_type": "Poem",
            "value": "Visceral awakening. Today is not without tears.\nNo innocence was lost as this was always in our fears.\nOur fight is forever internal. This is how we came to be.\nBeginning of this war is far from the day that is known to me.\nTrypillya, Greek, Huns, Slavic, and Viking are immortalized in stone and rivers.\nThe anguish you are suffering does not end without tears.\nThe fall of the soviet union is where it all became apparent.\nWhy do you feel that angst against your own? Are you not a parent?\nI dare you to place your naked self upon our chernozem.\nDo you forget that rich soil is what sustains us and them.\nOur families declare with hearts entrenched with certainty,\nof disinformation made so freely by your fraternity.\nThe eastern mind corrupted under your thumb.\nThe western mind is gnashing under the beat of this same drum.\nDo you see conflict as a benefit for either side?\nWe welcome your devices to our waters with one finger salute to use as a guide.\nCome get your warship from the bottom of the Black Sea it is buried there along with your pride.\nThe skeletons of war are eager to join you in song and dance as your mistress bride.\nToday, let's make a toast for our heroes and gaze on victory.\nA precedent of outsiders trampled into our souls throughout history.\nЩе не вмерла України ні слава, ні воля. (Ukraine's freedom has not yet perished, nor has her glory,)\nЩе нам, браття-українці, усміхнеться доля. (Upon us, fellow Ukrainians, fate shall smile once more.)\nЗгинуть наші вороженьки, як роса на сонці, (Our enemies will vanish like dew in the sun,)\nЗапануєм і ми, браття, у своїй сторонці. (And we too shall rule, brothers, in a free land of our own)"
        }
    ],
    "collection": {
        "name": "For Ukraine|Project (FU|P) - Limited Edition Poster",
        "id": "B647558F-575E-4B43-AC26-D0B9089FA429",
        "attributes": [
            {
                "type": "description",
                "value": "Limited edition poster of the For Ukraine|Project (FU|P) that includes all twenty four generative pieces and their descriptions in visual display of the embedded poem."
            },
            {
                "type": "icon",
                "value": "https://scotopic.xyz/assets/img/chia/nfts/fup-limited/thumbnail.png"
            },
            {
                "type": "banner",
                "value": "https://scotopic.xyz/assets/img/chia/nfts/fup-limited/banner.png"
            },
            {
                "type": "twitter",
                "value": "@alxgoryuk"
            },
            {
                "type": "website",
                "value": "https://scotopic.xyz"
            }
        ]
    }
}
Metadata: Create individual NFT metadata (numbered file output)
For a more complex example that contains different metadata for each NFT you could also write a bash loop to generate the metadata: This example comes from creating the metadata for the For Ukraine | Project (FU|P).
 # bash array of NFT descriptions
fupPoem=(
"Visceral awakening. Today is not without tears."
"No innocence was lost as this was always in our fears."
"Our fight is forever internal. This is how we came to be."
"Beginning of this war is far from the day that is known to me."
"Trypillya, Greek, Huns, Slavic, and Viking are immortalized in stone and rivers."
"The anguish you are suffering does not end without tears."
"The fall of the soviet union is where it all became apparent."
"Why do you feel that angst against your own? Are you not a parent?"
"I dare you to place your naked self upon our chernozem."
"Do you forget that rich soil is what sustains us and them."
"Our families declare with hearts entrenched with certainty,"
"of disinformation made so freely by your fraternity."
"The eastern mind corrupted under your thumb."
"The western mind is gnashing under the beat of this same drum."
"Do you see conflict as a benefit for either side?"
"We welcome your devices to our waters with one finger salute to use as a guide."
"Come get your warship from the bottom of the Black Sea it is buried there along with your pride."
"The skeletons of war are eager to join you in song and dance as your mistress bride."
"Today, let's make a toast for our heroes and gaze on victory."
"A precedent of outsiders trampled into our souls throughout history."
"Ще не вмерла України ні слава, ні воля. (Ukraine's freedom has not yet perished, nor has her glory,)"
"Ще нам, браття-українці, усміхнеться доля. (Upon us, fellow Ukrainians, fate shall smile once more.)"
"Згинуть наші вороженьки, як роса на сонці, (Our enemies will vanish like dew in the sun,)"
"Запануєм і ми, браття, у своїй сторонці. (And we too shall rule, brothers, in a free land of our own)"
)

 # bash loop to create individual NFT metadata files
for index in ${!fupPoem[@]}; do
  #echo ${fupPoem[$index]}
  num=$((index+1))
  NFT_NUM=$(printf "%02d" $num)
  METADATA='{"Editions Total": 16,"Russian warship (Moskva)":"Snake Island, I, Russian warship, repeat the offer: put down your arms and surrender, or you will be bombed. Have you understood me? Do you copy?", "Ukrainian 1 to Ukrainian 2":"Thats it, then. Or, do we need to f*** them back off?", "Ukrainian 2 to Ukrainian 1":"Might as well.", "Ukrainian 1":"Russian warship, go f*** yourself.", "Image Source":"https://bafybeiclfv23bxqpf2gpaeosub43qocafgpgwqqptmqou2giput6ohery4.ipfs.nftstorage.link/'"${NFT_NUM}"'.flam3"}'
  python metadata.py -cm fup_collection_metadata.json -od "_meta" -gm "${NFT_NUM}" "For Ukraine|Project #${NFT_NUM}" "${fupPoem[$index]}" "${METADATA}"
done
All the custom metadata is in the METADATA shell var that gets merged with the fup_collection_metadata.json and written to the _meta dir.
The result is 24 files based on the number of strings in the fupPoem bash array.
Metadata: Validate all metadata
You can then validate an entire directory of metadata via:
python metadata.py -vm "_limited-edition/_meta" -vs "CHIP-0007-NFT1-JSON-SCHEMA.json"
Metadata: Upload to permastore
Optionally, you can now upload the metadata to IPFS. I recommend waiting until you have the licese file ready to avoid multiple uploads.
If you are new to the web3 scene and need help figuring out where to upload metadata then head over to NFT data and metadata permastore best practices.
Create the Project License
While it’s a personal preference on whether to even include a license in a project I’d suggest having one if you have no preference. Having a license along side your project looks good in NFT galleries, gives more confidence to you as a creator, and some peace of mind about your desire about your project beyond the minting phase.
The simplest is to choose something from Creative Commons licenses. You can even copy/embed a plain text Creative Commons licenses
Upload the Final Metadata and License
Finalize all assets and re-upload the whole directory again. Note how any previously uploaded directories have the same IPFS CIDs (hashes). In https://NFT.storage, I also delete the initial root CID knowing the newly uploaded root CID will contain everything.
Mint the project ( testnet )
It’s time to test the waters with the mint process and see how things work. You could skip right to mainnet if you got the process figured out.
Testnet: Create a New Wallet
Generate a new mnemonic:
$ chia keys generate;
Generating private key
Added private key with public key fingerprint 301031456
Show and record the mnemonic for yourself somewhere safe (I recommend 1Password app):
$ chia keys show --show-mnemonic-seed;

Fingerprint: 301031456
Master public key (m): b5188f215129f5c353f4086869d008be8097c8b620e1574f7166c13a6ed391c40bdf00f01ff932f7a42f5b13ef21c584
Farmer public key (m/12381/8444/0/0): 88be3047a13670cf484a3f4b1e322dbc545bb9d8c90f001b34e4c652d941ff0adf74ef9af32a528dd8ba9a96b179db6c
Pool public key (m/12381/8444/1/0): a4b83bb1844075e1564cf45862b2da5af1c0f70c665fc1935a9b86f014b9a3dbdde33b6bc39c655466b429cb6b161e67
First wallet address: txch1prr9fn9tqpsvph6yxyp4uvj6692r60qx09kj6e60mukd2pfhte2q0gu02q
Master private key (m): <keep this private>
First wallet secret key (m/12381/8444/2/0): <keep this private>
  Mnemonic seed (24 secret words):
<your mnemonic to never show anyone>
Verify you can see the new wallet in your list:
$ chia wallet show

Wallet keys:
1)   2586333426
2)   3830465658
3) * 3936560748 (Synced)
4)   3494309279
5)   301031456 <this is the new wallet>
Testnet: Send TXCH to New Wallet
The very first thing is getting TXCH to your wallet which you can get from XCHdev.com. This will allow you to use fees during minting otherwise you may get stuck in the mempool and never mint.
I already have a testnet DID and an old wallet so I’ll just transfer between my own wallets.
DID_TESTNET="did:chia:1fv2r738g7q6nn4k0j7ur9wjcf4vt5p0v27ncpdz2uc82zgdvg26qz38s56"
NEW_WALLET_FINGERPRINT="301031456"
OLD_WALLET_FINGERPRINT="3936560748"
CHIA_FEE_XCH="0.000000001"

chia wallet show -f $OLD_WALLET_FINGERPRINT
Next, send a bit of TXCH to your new first wallet address:
TO_ADDRESS=txch1prr9fn9tqpsvph6yxyp4uvj6692r60qx09kj6e60mukd2pfhte2q0gu02q
CHIA_XCH=1.0

 # echo out to screen what we are sending to verify, then simply copy/paste to execute
echo chia wallet send -f $OLD_WALLET_FINGERPRINT -a $CHIA_XCH --address $TO_ADDRESS --fee $CHIA_FEE_XCH
For example, for me above looked like this:
$ echo chia wallet send -f $OLD_WALLET_FINGERPRINT -a $CHIA_XCH --address $TO_ADDRESS --fee $CHIA_FEE_XCH
chia wallet send -f 3936560748 -a 1.0 --address txch1prr9fn9tqpsvph6yxyp4uvj6692r60qx09kj6e60mukd2pfhte2q0gu02q --fee 0.0000000001

 # verified the command looks good and copy/pasted from above:
$ chia wallet send -f 3936560748 -a 1.0 --address txch1prr9fn9tqpsvph6yxyp4uvj6692r60qx09kj6e60mukd2pfhte2q0gu02q --fee 0.0000000001
Submitting transaction...
Transaction submitted to nodes: [{'peer_id': '2c7feefd0aef0fabb367effff1e39aa07f47f2746336fce04e2234b9ce6bdc39', 'inclusion_status': 'SUCCESS', 'error_msg': None}]
Run 'chia wallet get_transaction -f 3936560748 -tx 0x0fc99ad7e062c2fd052a67dc912621d4127ac57d8cae2457541743f401dfc202' to get status
Verify the new wallet received the TXCH:
chia wallet show -f $OLD_WALLET_FINGERPRINT

chia wallet show -f $NEW_WALLET_FINGERPRINT
Here’s what I see in the new wallet:
$ chia wallet show -f $NEW_WALLET_FINGERPRINT

Wallet height: 1753160
Sync status: Synced
Balances, fingerprint: 301031456

Chia Wallet:
   -Total Balance:         1.0 txch (1000000000000 mojo)
   -Pending Total Balance: 1.0 txch (1000000000000 mojo)
   -Spendable:             1.0 txch (1000000000000 mojo)
   -Type:                  STANDARD_WALLET
   -Wallet ID:             1

Connections:
Type      IP                                     Ports       NodeID      Last Connect      MiB Up|Dwn
FULL_NODE 127.0.0.1                              58444/58444 2c7feefd... Nov 03 14:36:41      0.1|0.1
                                                 -Height: No Info    -Hash: No Info    -Trusted: True
Great so we got a new Chia wallet and TXCH. Now we need an NFT wallet + DID for minting.
Testnet: Create or Send your Testnet DID to a New Wallet
Look at your old wallet and let it sync back again:
chia wallet show -f $OLD_WALLET_FINGERPRINT
Next, let’s transfer the testnet DID to your new wallet:
DID_WALLET_ID=2
 # verify it's all good and then copy/paste to execute
echo chia rpc wallet did_transfer_did \'{\"wallet_id\": $DID_WALLET_ID, \"inner_address\": \"${TO_ADDRESS}\", \"fee\": 1000}\'
For example:
$ echo chia rpc wallet did_transfer_did \'{\"wallet_id\": $DID_WALLET_ID, \"inner_address\": \"${TO_ADDRESS}\", \"fee\": 1000}\'
chia rpc wallet did_transfer_did '{"wallet_id": 2, "inner_address": "txch1prr9fn9tqpsvph6yxyp4uvj6692r60qx09kj6e60mukd2pfhte2q0gu02q", "fee": 1000}'

 # verify and copy/paste
chia rpc wallet did_transfer_did '{"wallet_id": 2, "inner_address": "txch1prr9fn9tqpsvph6yxyp4uvj6692r60qx09kj6e60mukd2pfhte2q0gu02q", "fee": 1000}'

{
    "success": true,
    "transaction": {
        "additions": [
...
Verify your DID has been received in the new wallet, should look like this:
$ chia wallet show -f $NEW_WALLET_FINGERPRINT
Wallet height: 1753207
Sync status: Synced
Balances, fingerprint: 301031456

Chia Wallet:
   -Total Balance:         1.0 txch (1000000000000 mojo)
   -Pending Total Balance: 1.0 txch (1000000000000 mojo)
   -Spendable:             1.0 txch (1000000000000 mojo)
   -Type:                  STANDARD_WALLET
   -Wallet ID:             1

DID did:chia:1fv2r738g7q6nn4k0j7ur9wjcf4vt5p0v27ncpdz2uc82zgdvg26qz38s56:
   -Total Balance:         1.0
   -Pending Total Balance: 1.0
   -Spendable:             1.0
   -Type:                  DECENTRALIZED_ID
   -DID ID:                did:chia:1fv2r738g7q6nn4k0j7ur9wjcf4vt5p0v27ncpdz2uc82zgdvg26qz38s56
   -Wallet ID:             2

Connections:
...
Testnet: Create NFT Wallet
The last required step to prep for minting is creating a DID NFT wallet for minting.
chia wallet nft create -f $NEW_WALLET_FINGERPRINT -di $DID_TESTNET -n "testnet w scotopic DID"
chia wallet show -f $NEW_WALLET_FINGERPRINT
Successful creation should look like this:
$ chia wallet show -f $NEW_WALLET_FINGERPRINT

Wallet height: 1753212
Sync status: Synced
Balances, fingerprint: 301031456

Chia Wallet:
   -Total Balance:         1.0 txch (1000000000000 mojo)
   -Pending Total Balance: 1.0 txch (1000000000000 mojo)
   -Spendable:             1.0 txch (1000000000000 mojo)
   -Type:                  STANDARD_WALLET
   -Wallet ID:             1

DID did:chia:1fv2r738g7q6nn4k0j7ur9wjcf4vt5p0v27ncpdz2uc82zgdvg26qz38s56:
   -Total Balance:         1.0
   -Pending Total Balance: 1.0
   -Spendable:             1.0
   -Type:                  DECENTRALIZED_ID
   -DID ID:                did:chia:1fv2r738g7q6nn4k0j7ur9wjcf4vt5p0v27ncpdz2uc82zgdvg26qz38s56
   -Wallet ID:             2

testnet w scotopic DID:
   -Total Balance:         0.0
   -Pending Total Balance: 0.0
   -Spendable:             0.0
   -Type:                  NFT
   -DID ID:                did:chia:1fv2r738g7q6nn4k0j7ur9wjcf4vt5p0v27ncpdz2uc82zgdvg26qz38s56
   -Wallet ID:             3

Connections:
...
Testnet: Prep Minting Toolset
You should already have the project metadata, data and license ready. This step is to setup Chia NFT minter toolset to use for the next steps
You should be able to check this out anywhere since chia is pulled in as a dependency:
git clone https://github.com/scotopic/chia-nft-minter.git fup-limited-minter
cd fup-limited-minter

# follow the setup on the wiki https://github.com/scotopic/chia-nft-minter#setup
python3 -m venv venvnft
. ./venvnft/bin/activate
pip3 install -r requirements.txt
 # fix the `bdist_wheel` error
sudo apt install python3.8-venv python3.8-dev
 # reinstall required libs
pip3 install -r requirements.txt
For example my directory structure is as follows:
~/Documents/chia-blockchain/fup-limited-minter$ ls -la

total 116
drwxrwxr-x  4 ... .
drwxrwxr-x 17 ... ..
-rw-rw-r--  1 ... chia_overrides.py
drwxrwxr-x  8 ... .git
-rw-rw-r--  1 ... .gitignore
-rw-rw-r--  1 ... LICENSE
-rw-rw-r--  1 ... nft_mint_nft.py
-rw-rw-r--  1 ... nft_mint_prep.py
-rw-rw-r--  1 ... nft_offers.py
-rw-rw-r--  1 ... README.md
-rw-rw-r--  1 ... requirements.txt
drwxrwxr-x  6 ... venvnft
Testnet: Copy your project to the toolset dir
I copied over a fup-limited directory with the contents of what I’ve uploaded to permastore:
~/Documents/chia-blockchain/fup-limited-minter$ ls -la fup-limited/

total 28
drwxr-xr-x 5 ... .
drwxrwxr-x 5 ... ..
drwxr-xr-x 2 ... images
drwxr-xr-x 2 ... license
drwxr-xr-x 2 ... meta
Testnet: Prep Minting Metadata
Now you have to gather it all into a “minting metadata” file. This is simply pieces of your project acting as inputs to the Chia CLI/RPC commands put into a JSON file.
The script takes in the data directories and “minting metadata” output directory. I also specify the project will mint 16 editions of a single asset (the poster - PDF file) with 5% royalty attached to each. The primary sales and royalties all go to the same address/wallet in this case.
python3 nft_mint_prep.py \
-pmd "fup-limited/images" "fup-limited/meta" "fup-limited/license/license.txt" "_minter_data_testnet" \
-udi "https://bafybeiav4c4qtz2d45ylio4pugpiyssulyj4ljnz6j6irbxehzscshrl3e.ipfs.nftstorage.link/images" \
-umi "https://bafybeiav4c4qtz2d45ylio4pugpiyssulyj4ljnz6j6irbxehzscshrl3e.ipfs.nftstorage.link/meta" \
-uli "https://bafybeiav4c4qtz2d45ylio4pugpiyssulyj4ljnz6j6irbxehzscshrl3e.ipfs.nftstorage.link/license/license.txt" \
--edition-total      3 \
--royalty-percentage 500 \
--royalty-address    txch1prr9fn9tqpsvph6yxyp4uvj6692r60qx09kj6e60mukd2pfhte2q0gu02q \
--target-address     txch1prr9fn9tqpsvph6yxyp4uvj6692r60qx09kj6e60mukd2pfhte2q0gu02q
The output of above command is as follows:
$ cat  _minter_data_testnet/fup-limited-meta.json;echo;
{
    "uris": [
        "https://bafybeiav4c4qtz2d45ylio4pugpiyssulyj4ljnz6j6irbxehzscshrl3e.ipfs.nftstorage.link/images/fup-limited-meta.png"
    ],
    "hash": "1ca678e81a6a742f713d6a686c5dff8def0ae1947871cd98804e1635d4201c41",
    "meta_uris": [
        "https://bafybeiav4c4qtz2d45ylio4pugpiyssulyj4ljnz6j6irbxehzscshrl3e.ipfs.nftstorage.link/meta/fup-limited-meta.json"
    ],
    "meta_hash": "7dcad2aee386a09a90520382b535b6cbfba1d12015a953b299b0b4c79d4d4f2f",
    "license_uris": [
        "https://bafybeiav4c4qtz2d45ylio4pugpiyssulyj4ljnz6j6irbxehzscshrl3e.ipfs.nftstorage.link/license/license.txt"
    ],
    "license_hash": "08e52f62c0f2eeaaf5903a24a2413c35649ad7c125af9be9adddc853d819c904",
    "edition_total": "3",
    "royalty_address": "txch1prr9fn9tqpsvph6yxyp4uvj6692r60qx09kj6e60mukd2pfhte2q0gu02q",
    "target_address": "txch1prr9fn9tqpsvph6yxyp4uvj6692r60qx09kj6e60mukd2pfhte2q0gu02q",
    "royalty_percentage": "500"
}
However this generates INCORRECT “minting metadata” because nft_mint_prep.py assumes two things:
- all images are
.png images/andmetadata/contains files named similarly for exampleimages/myimage1.pngandmetadata/myimage1.json
Since I’m generating FPF project I will manually edit and verify:
$ sha256sum fup-limited/images/FUP-poster-w-poem.jpg
d775ed4dcd4e46699f7d7a3a088b14ff186db60a8acac7c04298fb2b11bff4c8  fup-limited/images/FUP-poster-w-poem.jpg

$ sha256sum fup-limited/meta/fup-limited-meta.json
9b2970b6a6a466cffbfcc3a99723c07857e3c91f2eccfdd71f61bb55d7c895c5  fup-limited/meta/fup-limited-meta.json

$ sha256sum fup-limited/license/license.txt
08e52f62c0f2eeaaf5903a24a2413c35649ad7c125af9be9adddc853d819c904  fup-limited/license/license.txt
The final “minting metadata” file looks like this:
cat  _minter_data_testnet/fup-limited-meta.json;echo;
{
    "uris": [
        "https://bafybeiav4c4qtz2d45ylio4pugpiyssulyj4ljnz6j6irbxehzscshrl3e.ipfs.nftstorage.link/images/FUP-poster-w-poem.jpg"
    ],
    "hash": "d775ed4dcd4e46699f7d7a3a088b14ff186db60a8acac7c04298fb2b11bff4c8",
    "meta_uris": [
        "https://bafybeiav4c4qtz2d45ylio4pugpiyssulyj4ljnz6j6irbxehzscshrl3e.ipfs.nftstorage.link/meta/fup-limited-meta.json"
    ],
    "meta_hash": "7dcad2aee386a09a90520382b535b6cbfba1d12015a953b299b0b4c79d4d4f2f",
    "license_uris": [
        "https://bafybeiav4c4qtz2d45ylio4pugpiyssulyj4ljnz6j6irbxehzscshrl3e.ipfs.nftstorage.link/license/license.txt"
    ],
    "license_hash": "08e52f62c0f2eeaaf5903a24a2413c35649ad7c125af9be9adddc853d819c904",
    "edition_total": "3",
    "royalty_address": "txch1prr9fn9tqpsvph6yxyp4uvj6692r60qx09kj6e60mukd2pfhte2q0gu02q",
    "target_address": "txch1prr9fn9tqpsvph6yxyp4uvj6692r60qx09kj6e60mukd2pfhte2q0gu02q",
    "royalty_percentage": "500"
}
Testnet: Mint the NFTs
Verify you are still in the correct wallet:
chia wallet show -f $NEW_WALLET_FINGERPRINT
Do a test run of your command which doesn’t actually mint but verifies you have everything prepared.
The --override-address is only necessary if the specified address in _minter_data_testnet is not what you want.
python3 nft_mint_nft.py \
-md "_minter_data_testnet" \
--wallet-id 3 \
--fee-mojos 11 \
--override-address txch1prr9fn9tqpsvph6yxyp4uvj6692r60qx09kj6e60mukd2pfhte2q0gu02q \
--dry-run
Finally run the same command without the --dry-run:
python3 nft_mint_nft.py \
-md "_minter_data_testnet" \
--wallet-id 3 \
--fee-mojos 11 \
--override-address txch1prr9fn9tqpsvph6yxyp4uvj6692r60qx09kj6e60mukd2pfhte2q0gu02q
Testnet: Looking at the minted NFTs
Usually you can watch the minted NFTs showup in MintGarden Acitivty website
Mint the project ( mainnet )
Go back to Create a New Wallet and follow the steps using Chia mainnet instead of testnet. The only difference will be the DID and XCH addresses you’ll use for the minting process.
Final Words
First time running through the process can be a bit challenging. This guide was created as much for anyone to dive deeper into the minting process as it was for me to document the steps involved. As always, reach out to me if you have questions or have suggestions on improving above process.
Good luck with your next minting project!